Since the Real-time GPS data from Total Performance Data (TPD) was integrated with Bet Angel it’s transformed the way many in-running traders who use Bet Angel have been able to trade in-play. For the first time, it’s been possible to automate their in-running trading strategies.
By having the ability to now trigger bets using TPD’s real-time GPS data it gives Bet Angel automation users unique advantages over those with in-running bots using only the price data from Betfair – however this real-time GPS data from TPD is not exclusive to just automation users of Bet Angel.
Racecourse data for manual in-play traders
As you may remember, from some of the screenshots in the first blogs and video’s we published. Bet Angel receives from TPD and that can be used throughout other areas of the software as well.
This includes having it displayed on your ladder, one-click trading screens and in various other places within the software. This gives Bet Angel’s manual in-running racing traders access to the same real-time GPS data as automation users.
This in turn gives manual traders using Bet Angel with TPD’s data a big advantage over other manual traders who are relying solely on market data from Betfair and TV pics which are typically delayed by around 5-7secs.
Setting up Bet Angel to receive racecourse data
Whether you are trading manually or using automation, before you can use any of the data from Total Performance Data it will need to be put into something called a ‘Stored Value’
Automation users will already know what this is, but for manual traders or those new to Bet Angel, a Stored Value is a feature of Bet Angels Automation tool. Once the data is in a Stored Value it can then be used to trigger your automated bets/alerts, or if you are a manual trader the Stored Value can also be passed to and displayed on your one-click and ladder trading screens.
That might sound complicated especially if you are new to Bet Angel and/or it’s automation but it actually quite easy and straight forward to set up as you’ll see when following in the steps below.
Creating the Rules File
The first step is to create a rules file using some stored values that I mentioned above, and to do this you need to open Guardian by clicking the green ‘G’ icon, next open the rules editor in Guardian by clicking on the ‘Automation’ tab then ‘Create a new rules file for selected market’

NB; To create any rules file you also need to add at least one market to guardian (it doesn’t matter which market at this time) and select it in the lower market list window
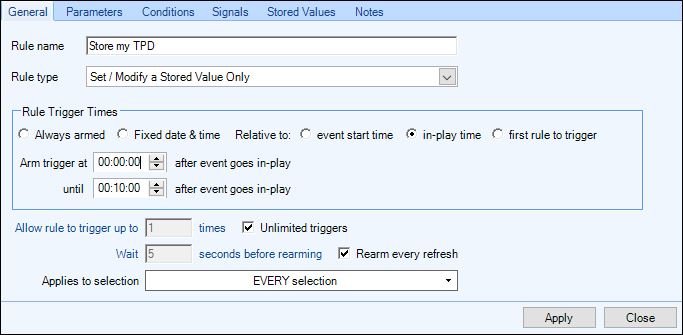
When the ‘Rules Editor’ opens the first thing you need to do is give the rule a name, I’ve called this one ‘Store mt TPD’, then below that select the rule type that you need, in this instance it would be the ‘Set/Modify a Stored Value’, rule. Then you can then set the time the rule is armed from-till, the number of times it can trigger and which selection it’s to trigger on etc. You can set this to suit whatever you want but 99.9% of the time when doing this you’ll want it triggering as fast as possible, on every selection, and throughout the whole race so you’ll be setting it up as shown in the next image.
Now we can move straight onto the Stored Value tab, here you can select which data you want to use from TPD and put into a Stored Value. For the purposes of this example, let’s assume you want the ‘Position’ and ‘Distance to finish’ data for the selections.
When you create a Stored Value (for anything not just TPD information), you give each Stored Value a unique name of your choice, it’s this name which then allows you to use this particular Stored Value with other rules in the file, and when the (shared) box is ticked the Stored Value can also be referenced and used throughout other area’s of Bet Angel, for example on the One-Click or Ladder trading screens, or even in the Guardian market list, Advanced Charts and Coupons etc.
I’ve then set it to Store the Value ‘for the current selection’ (ie, the selection the rule is applied to – remember we have the rule applied to every selection and you can see that confirmed under the current selection box).
After that we need to select what it is we want to store, here you need to select ‘Total Performance Data about a Selection’, a sub menu will then appear where you can select which selection data from TPD you want and for this I’ve selected ‘Position in the Race’
A quick tip – when deciding what to name a Stored Value I always try and name each along the lines of the data/task they have been created for, hence for this first Stored Value I’ve simply named it ‘current_position’
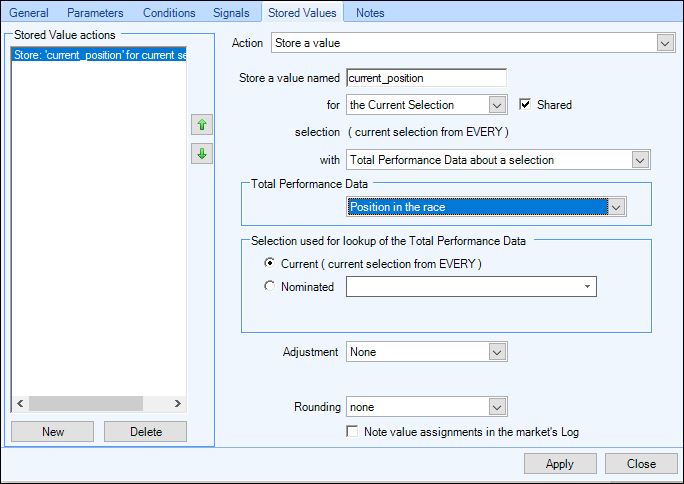
Now each time this rule triggers it will get the ‘Position in race’ from TPD and store it as a value named ‘current_position’ for every selection
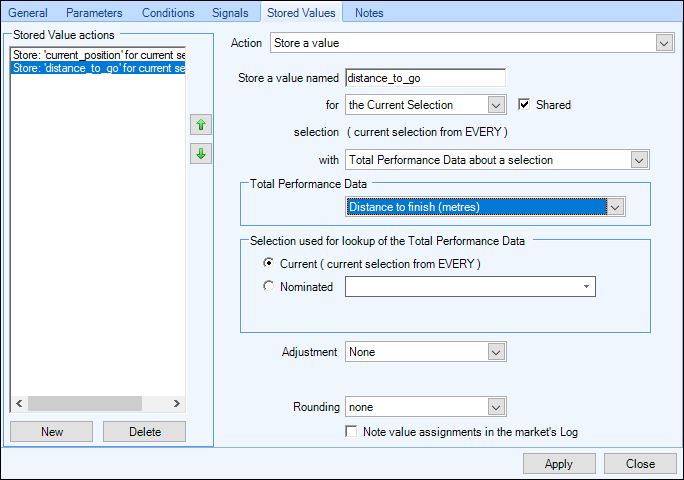
Now we can click the ‘New’ button at the bottom of the window and add our second stored value, this time we want the ‘Distance to finish (meters)’ so have selecting it from the pick list, the only other thing to change here is the stored value name, and for this one I’ve named it ‘distance_to_go’.
And that’s it, the rules file is made and ready to be used, the last thing to do is click the disc+ icon at the top of the window to save it and name it.
If you want you can continue and add as more stored values in the same way using any of the TPD data available in the pick list, even if you don’t need every value all the time on your trading screen it won’t do any harm for a rule to still to put it into a Stored Value it if there’s a chance you might want it in future.
Adding Additional Rules
You could also add further ‘Stored Value rules’ to your automation file, an example of when you might want to do this rather than just storing all your values with the same rule would be if you wanted some of them stored using a different update rate, for example you might want to store the traded volume volume for each selection, but only want this updating every second, or every 5 seconds rather than every time the market is refreshed.
Applying the Rules File
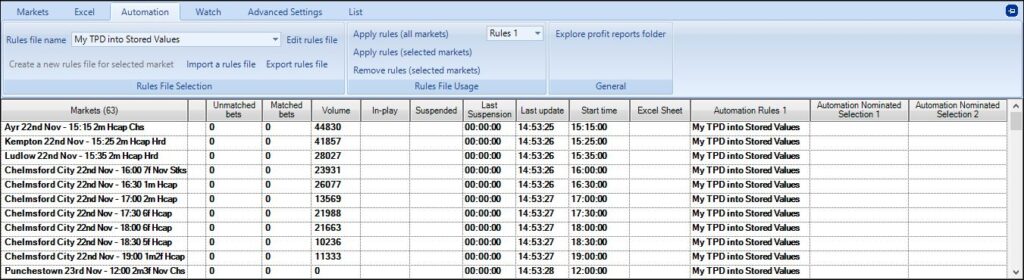
Once you’ve created and saved your rules file all you need to do now is just add your markets to Guardian each day and apply the rules file to them all, and this can all be done with just one click as detailed in the following blog
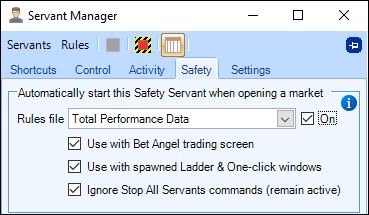
Using a Safety Servant
Another option available to you once you’ve created the rules file is to use it as a ‘Safety Servant’.
If you are not familiar with Servants and in particular ‘Safety Servants’, please see this page of our User Guide for full details, but briefly when using a rules file as a ‘Safety Servant’ whenever you open a market on your ladder or one-click trading screens the ‘Safety Servant’ will automatically apply the rules file you’ve given it to that market – without the need for you to do anything including adding the markets to Guardian.
To run a rules file as a ‘Safety Servant’ launch the Servant Manager window by clicking on the ‘Bellboy Icon’, then select the ‘Safety’ tab. You’ll then be able to select the rules file you want to run as a Safety Servant from the pick list, once you’ve done that tick the ‘On’ box to enable it. The Servant Manager window can now be closed and it will now start your rules file each time you open a market on your main trading screen.
Displaying the Stored Values
Now you have the rules file set up and it’s ready to use the next thing we need is to configure the one-click trading screen to display those stored values, for step by step details on doing this please see the following blog post: –
Click here to learn how to do that
