As regular Bet Angel users will be aware, the One-Click trading screen in Bet Angel is the most customizable of any Betfair Trading software.
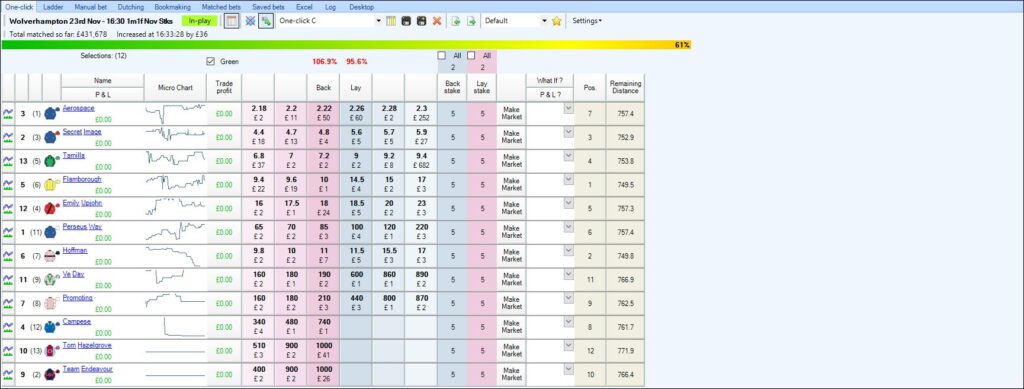
Not only can its appearance and layout be configured to your individual liking, but the information from the market it can display for each selection is nearly endless. As you can see in the image below the custom columns you can create for your one-click trading screen can display an array of pre-set information available
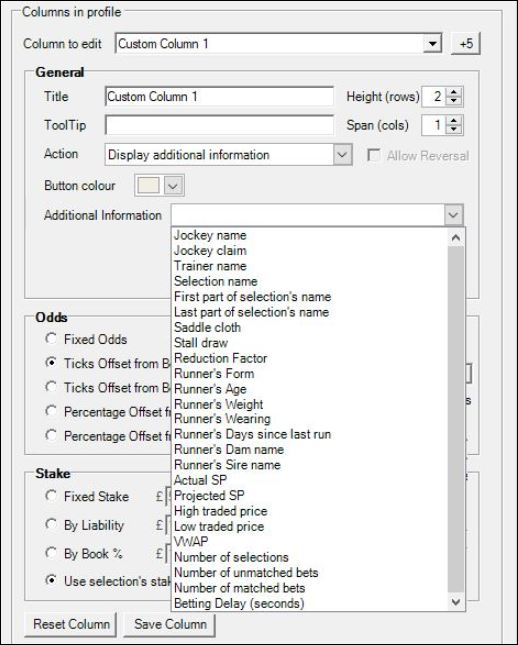
But the real power and flexibility lie in the ability to display Stored Values from a rules file.
A Stored Value (shared) can literally display any type of data from a market you want and from any moment in time. This can range from a simple piece of data like a selections VWAP to values made up from calculations like the rolling average amount traded on a selection in the last 30secs to even more complex calculations made up of several metric’s.
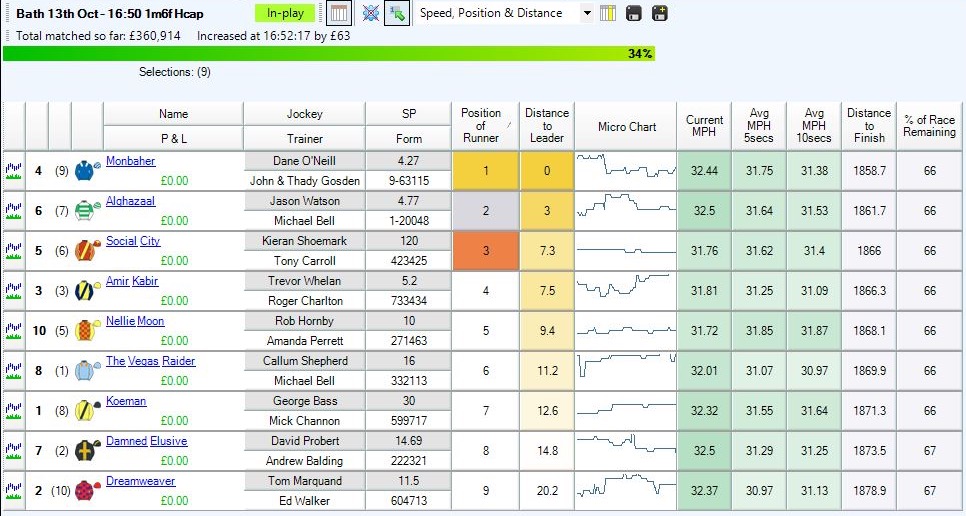
If you are an In-Running horse racing trader you will also be able to use the real-time GPS data from Total Performance data as a Stored Value.
So in this blog, I’ll be going through the steps needed to create some custom columns to display your Stored Values (shared) from a rules file on your one-click trading screen, and for this example I will be using the Stored Values which I recently created in another blog for the ‘position’ and ‘distance to finish’ from Total Performance Data’s real-time GPS data .
Creating a stored value
If you haven’t seen it and want to learn how to create a rule to store the Values of any type of market data you need to visit this blog post and follow the steps provided.
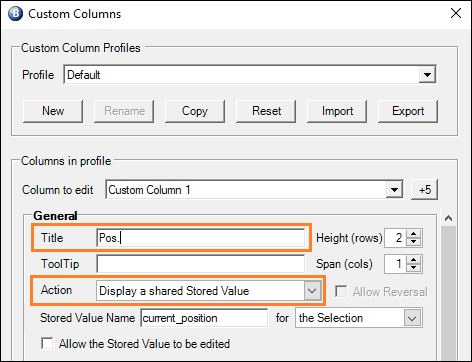
As a brief recap in that example, I showed how to create a rule with two Stored Values (shared), the first value stored was a selections ‘Position’ with a stored value named ‘current_position’,
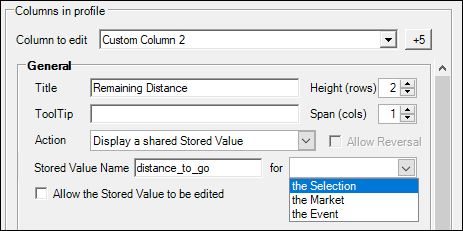
the second value stored was a selections ‘Distance to Finish (meters)’ and this shared stored value was named ‘distance_to_go’
The rule was applied to every selection and it will trigger and update those stored values every time the market is refreshed, so it will always have the most up to date information.
Alternatively, if you already have your own rules file/s with your own stored values and now just want to know how to display them on your one-click screen you can still follow the steps below and replace the stored value names I’ve used for whatever you’ve named yours.
NB, your stored value must have the ‘shared’ box ticked in your rule to be able to pass it to your one-click screen and other areas of Bet Angel, so if you haven’t ticked that when making your rules file you’ll need to go back and tick that option near the top of the Stored Value tab
Getting Started
On your One-Click screen click the yellow star icon to open the Custom Column editor, then at the top select the custom column profile you want to edit or click the ‘New’ button to create a new one.
Then we need to choose a column to edit, this will probably be ‘Custom Column 1’ unless you have already created some columns in which case select the next free custom column you have available.
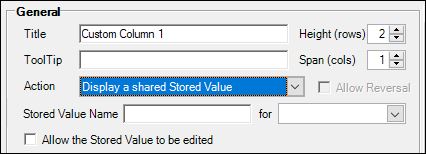
Next, give the column a title (this is what the column header will display), and select the action you want the column to do, for this part we need to select ‘Display a Shared Stored Value’
Then in the area’s provided below that enter the details of the stored value you want to display, for this first one that would be a stored value name of ‘current_position’ for ‘the selection’
And that’s the first custom column done, if you want to change the column and/or text colours you can use the Value-Based Colour Settings further below (I’ll cover that option in more detail in another blog), if you are not wanting to use these just yet you can go straight to the bottom of the window and click the ‘Save Column’ button.
Now we can create the next custom column by selecting the next available column to edit and repeat the steps above this time using a different title and of course the stored value name it’s to display needs to be different, this time we’ll be entering ‘distance_to_go’ for the Stored value name – and just as before this will be for the ‘Selection’.
NB; If you are following along with this and setting up your existing/own stored values remember to use whatever name/s you did when creating the rules file in Guardian.
Once you’ve finished adding and saved the last custom column you need as part of this profile this window can be closed and you can return to the one-click screen.
Where you won’t see the columns you’ve just created!
Before you’ll see any custom columns you’ve created there’s one last thing to do and that’s to enable them, we do this using the column chooser (the icon that looks like a calendar with a yellow line through it)
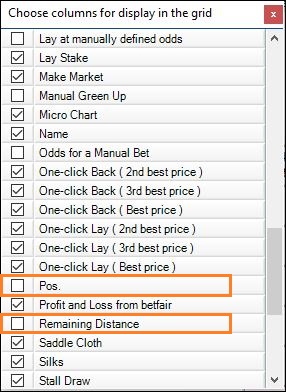
Once you’ve ticked the columns you want (and unticked any you don’t) you can return to the one-click screen where you’ll now see your new columns.
All you need to do now is wait for the next race to start which is supported by Total Performance Data and you’ll see the values displayed in the new custom columns.
If you click the disc icon that will save this one-click layout, or you can click the disc+ icon and save it as a new one-click layout, ie, you could call it ‘My In-Play TPD Grid’ you’ll then be able to switch back to your standard layout when you don’t need these columns and/or are trading other types of markets. If you are someone that trade’s a lot of different sports and types of markets you can go on to create and save as many of your own bespoke one-click screen layouts with their own custom columns displaying just the information you want/need for that market.
Moving and Resizing Columns
Finally, you can also change the order your columns (or any existing columns) appear in, simply by pointing your cursor at the edge of its header and when you see two small arrows press and hold your left mouse button while you drag it to the required location
You can also configure the font size, row height and row gap for the columns on your one-click and manual bet grids from the ‘Display’ tab in your main settings editor, here you can also ‘Allow Column Resizing’, which when enabled will let you manually drag your columns to any width you want, to do this point your cursor over the right side of the header border then with your left mouse button depressed drag it to the desired width and release the button
